Website of weather.net.nz Website of weather.net.nz
  • Home
    • About
    • Contact Us
  • Weather Now!
    • Severe Weather Bulletins
    • North Island Regional Weather
    • South Island Regional Weather
    • All New Zealand Current Conditions Map
    • Personal weather stations
    • Satellite Imagery
      • Himawari-8 (NICT & JMA)
      • Himawari-8 (NOAA)
      • Himawari-8 Historical
      • Zoom Earth
    • Lightning
    • Weather Models
      • Windy (GFS and ECMWF)
      • Weather Online
      • Metvuw
  • Latest News
    • Severe Weather Tracking
    • Tropical Cyclone Tracking
    • Members Blogs
  • Knowledge
    • Knowledge Wiki
    • Raspberry Pi Weather Station
    • Support and How-to's
    • Training
    • Other Sites
  • Search
  • Site Hosting
Additional components for ConsoleWD  - Weather Display for Raspberry Pi

Additional components for ConsoleWD - Weather Display for Raspberry Pi

In a previous post we provided the steps to install ConsoleWD, for a Davis weather station, and FTP the data to your website. As at the time of writing there are lots of other options around setup that you can also use with ConsoleWD. This post will provide a summary of each of those options
 

Different weather stations

First off we look at the different types of weather stations that will work with consoleWD. In the same way you choose to use a Davis station in the configuration, you can also chose other types of stations. Compatibility is shown in the table below:
 
ConsoleWD option   Compatability  Additional Notes
Ambient API  
API connectivity to data on the Ambient website.
See ambientweather.com for more details
Arduino (9600 baud)    Arduino boards
Davis IP Data Logger  Davis stations with IP datalogger  
Davis Weather Link Live (IP Bridge)  Davis stations with WLL  
Davis Weatherlink.com  Davis stations using weatherlink.com  
Davis WMII    
GW1000 Type Ecowitt type stations  
Irox  Irox stations  
LaCrosse 2310     
LaCrosse 3600    
Meteobridge    
OWWfile (One Wire Reader)  One Wire stations  
Rainwise CC-2000  Rainwise type stations  
Rainwise CC-3000  Rainwise type stations  
Rainwise IP  Rainwise IP type stations  
Ultimeter  Ultimeter type stations  
Universal (Raw Data input)    
Weather Flow Console    
WeatherFlow / Tempest    
Weather Underground API  
API connectivity to data on the Weather Underground website.
See wunderground.com for more details
WH1081   Available under a range of brands, and models
WMR100   Oregon Scientific type stations Refer to the Oregon Scientific website for more details
WMR200   Oregon Scientific type stations Refer to the Oregon Scientific website for more details
WMR300   Oregon Scientific type stations Refer to the Oregon Scientific website for more details
WM918   Oregon Scientific type stations Refer to the Oregon Scientific website for more details
WMR968   Oregon Scientific type stations Refer to the Oregon Scientific website for more details
WXT510/520 WXT530 (TBC) Refer to the Vaisala website for more details
 
Any of these options are available via the "Select a weather station type" drop down in the ConsoleWD Setup. If you know of any models that are compatible with the ones stated above, let us know in the comments and we will add them to the table
 

Feature add-ons

Along with the ConsoleWD install, comes a number of additional features. To help you work out what each of these do, I've listed the programs in the table below. 
 
When setting the above options up, I'd recommend that you use the config.html program - at least initially. This will create a brand new config.txt file, which you will need to copy / move into your consolewd directory, replacing the old config.txt
 
Once you have figured out what parameters you need to change, you can also edit the config.txt directly, but make sure you have a backup!
 
Program Description Enabled by
Croncloud Allows updates to be sent to Weather Cloud On the config.html page, make sure "Run Cron Programs" is ticked (under FTP Settings), then fill out the fields under "Weather Cloud Settings" incl the ID and Key/Password
Croncwop  Allows updates to be sent to CWOP On the config.html page, make sure "Run Cron Programs" is ticked (under FTP Settings), then fill out the 5 parameters under "CWOP Settings" including Station ID (Which you can get from the CWOP site), Latitude and Longitude
Crondavisair  Collects measurements from your Davis Air unit  Enable the "Davis Air Link (Air Quality)" feature in the cong.html page, and provide the network IP address to the sensor
Cronftpnoaareport  Generates a daily NOAA style report  Refer to dailynoaareport.htm in the consolewd directory
Cronftpreal  FTP component used to send data to a website  
Cronmysql / cronmysql2 / crontablecreate  Provides facility to store data into a database  Refer below
Cronpws  Allows updates to be sent to PWS  On the config.html page, make sure "Run Cron Programs" is ticked (under FTP Settings), then fill out the PWS ID and Password (both of which you can set up on the PWS site. Also tick the "Update PWS" box
Cronwindfinder  Allows updates to be sent to windfinder  On the config.html page, make sure "Run Cron Programs" is ticked (under FTP Settings), then fill out the Windfinder ID and Password (both of which you can set up on the Windfinder site. Also tick the "Update Windfinder" box 
Cronwow  Allows updates to be sent to WOW   On the config.html page, make sure "Run Cron Programs" is ticked (under FTP Settings), then fill out the WOW ID and Password (both of which you can set up on the UK Met Offices Weather Observations Site (WOW). Also tick the "Update WOW" box 
Cronwu  Allows updates to be sent to Weather Underground  On the config.html page, make sure "Run Cron Programs" is ticked (under FTP Settings), then fill out the 6 parameter values required, including location, username and password key (both of which you can set up on the WeatherUnderground website . 
 
 
This covers the main cron files that come with the consolewd package. However I'd strongly recommend you work your way through the config.html process, as there are a number of additional options that don't rely on a cron job:
  • facility to send updates to windy.com -   On the config.html page, make sure "Run Cron Programs" is ticked (under FTP Settings), then fill out the windy station number and API key (both of which you can set up on the windy.com website.  
  • Setting up of any offsets that may be required
  • Creation of custom files
  • Temperature, Rainfall and Humidity offsets
  • Setting up of emails with weather conditions
 

Fresh Weather Display Live

Way back when, there was a piece of software called Weather Display Live. Being Flash based, it was refreshed on a regular basis on the website when data is uploaded (ie no page refresh was required), giving the impression that the page reflected a "live" reading.
 
With the demise of Flash, a new solution has been developed using Java, called Fresh Weather Display Live. It looks and behaves in a similar way to the original version.  Of course you need to run it on a web server, so if you are keen to set FreshWDL up on your Raspberry Pi, you can. Alternatively upload both the config.js and the FreshWDLmaster.htm file (both of which you will find in your wdconsolefiles directory), to your website, update the details in the config.js file, and then open up the FreshWDLmaster.htm file in your browser.


ConsoleWD Gui

 Although ConsoleWD is designed to run from a command line there is a GUI. To get to it, you need to run the file WDpi. Locate the file in your consolewdfiles directory, and double click on it, then choose "execute".
You will see a window pop up, similar to the one below:
 
WDRpi
 
 
 And that's pretty much the current features that come with consoleWD. There's one more to cover seperately which is the storing of data in a database, otherwise feel free to browse the other articles on ConsoleWD.
 

Supporting us and feedback

If you think this article was helpful, there are a number of ways you can thank us. Feel free to add a comment and say thanks in the comments section below, or provide feedback if we've got something wrong. Also you are welcome to register on the site. The more members we have the more it encourages us to write these types of articles.  Alternatively if you are into all that social media stuff, feel free to share the article using the buttons below, and tell others about the site. Thanks!!
New Zealand Weather Network - Raspberry Pi Weather Station image No comments
Sending files to your website from your Raspberry Pi using SCP

Sending files to your website from your Raspberry Pi using SCP

 If you've been following the series of Raspberry Pi articles you'll see we've covered the following topics:
  • Installation of ConsoleWD - Weather Display for Raspberry Pi
  • Streaming a live video feed from your weather webcam
  • Automating the retreival of files from a source such as a webcam
We now want to get those files off to our website, which this article covers. At this point though I'm going to start assuming you know a bit about cron jobs, bash scripts and the like, which we covered in the earlier articles. If you feel like a refresher, then feel free to go back through one or more of the above articles.


Looking at options

 
There are a number of common ways we could use to send files from our Raspberry Pi, to another computer such as a website. There's
  • FTP - a less secure (passwords are sent as readable text) method and many places mentioned it was tricky to set up
  • SFTP - a secure method, but again I was warned it was tricky to set up
  • SCP - based on SSH and is a secure method - can be setup so that a password is not required to be sent at all
I went wth SCP (Secure Copy).  SCP is a means of securley transferring files between two machines on a network. SCP uses SSH for improved security and will prompt you if it needs a password or passphrase for authentication. You can find out more about SCP and some of the options we will be using here.
 
SSH or Secure Shell is a network communication protocol that enables two computers to communicate (c.f http or hypertext transfer protocol, which is the protocol used to transfer hypertext such as web pages) and share data. An inherent feature of ssh is that the communication between the two computers is encrypted meaning that it is suitable for use on insecure networks. You can find out more about SSH here
 
Sound complicated? Just think of them as two parts to the puzzle we need to make the connection work.


Getting started

 
You need to have at least the following setup / in place:
  • SSH needs to be enabled on your Raspberry Pi. To do that, from the desktop under the main menu find Preferences - Raspberry Pi Configuration. Open that up and go to the Interfaces Tab and enable SSH. Click on OK
  • SSH needs to be enabled on your webserver. This is normally done in the user.conf file for your account. Each hosting setup is different so I'd recommend asking your web host to help you with this if you don't know how. Of course for those hosting their weather sites with us, we can do that for you.
  • SCP should also be installed on your webserver. It normally is by default, but if it isn't, check with your webhost.
  • Your website will need to have a fixed IP - most have, but you should know what that IP address is
  • You should know what your connection port is on your webserver (Computer 2). If it's port 22 then SSH will connect by default on that. If it's not then it needs to be specified.
Passwordless authentication using SSH relies on two keys. Both are generated on the source computer (Computer 1 or your Raspberry Pi) and then one is moved to the destination computer (Computer 2 or your webserver). When a connection is made SSH checks for a match between the two keys, and if there is a match, opens the connection. If not the connection is rejected. So we first need to set up the keys  (if they don't exist already).


Generating and copying the SSH keys

 
There's a good description of the process, that I've based the following on located here if you need additional help along the way. This page also provides lots of details around some of the options you can use when generating keys
 
On your Raspberry Pi, jump into a Terminal Window (Accessories - Terminal), and type the following:
 
cd
mkdir -p .ssh
cd .ssh


SSH looks for keys in certian directories so we need to create a .ssh directory and then be in that directory when we generate the keys so they get saved there. Next type


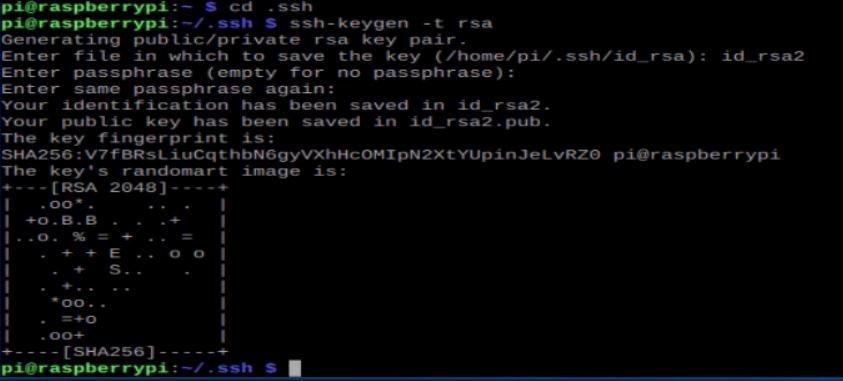
ssh-keygen -t rsa


At the next three prompts just press enter unless you need to change the key name.  The two keys will be generated and you will see something similar to this on your screen:
 
key gen
 
 Now on your Raspberry Pi, (Computer 1) browse to the current users .ssh directory and you will find two files:
  • id_rsa. This file needs to stay where it is. DO NOT share this file with anyone as if someone else has it they can access your Computer 2 or webserver
  • id_rsa.pub - this is the public key file that needs to go on Computer 2 / your webserver
Using something like the Raspberry Pi text editor, or nano if you prefer the command line, to open the file and view the contents. You will see a string of letters and numbers, which is your key.
 
We now need to copy this onto your webserver, (computer 2) so it's there to perform the key match. If you have access to your sites control panel there will be a way to install SSH from there, and it's probably the easiest way. Copy the key out of the id_rsa.pub file and paste it into the section in your sites control panel. Click on ok and it's done.
 
Alternatively you can try and copy the file up to the server - I had no luck doing that using step 4 in the steps  located here but it is possible just to create the file and paste the key into that.
 
If you want to copy the keys manually, on your web server, (computer 2) use the file browser to find the .ssh folder in the root of your account (ie not your home or public_html where your website sits, but the next level up. If it's not there you can create it.  In that folder either:
  • look for a file called authorized_keys. If it doesn't exist, create it and then paste the key from id_rsa.pub into it, and then save the file.
  • If the authorized_keys file already exists, open that file in a text editor and paste the key from id_rsa.pub, on the last line of this file. One key must be on one line, and each key must be on seperate lines. 
Finally set the permissions on the authorized_keys to 0600, and the .ssh directory to 0700. You can do this in the file manager available through your sites control panel or via using chmod in terminal
 
chmod 0600 authorized_keys
chmod 0700 /.ssh/
  
There's more information here on file permissions and how to set them if you need it.


Testing the SSH key setup

 
You should be able to test that you can connect by using the following from the command line:
ssh <websiteusername>@<website IP address>
 
If that doesn't work you might need to specify the connection port. You can do that this way
 ssh -p 23 This email address is being protected from spambots. You need JavaScript enabled to view it.
where 23 is the port you want to connect on, huttwe is the user you want to connect with, and 12.34.56.78 is the ip address of your website (Computer 2). Instead of your IP address you can also use a FQDN eg. example.com
 
NOTE: you will need to try and connect once like this, as the first time you connect SSH will ask for a password to your account. Next time though SSH will store the info for the connection, and just connect without a password.


Setting up the SCP connection

 
If you have got this far then well done! You are mostly there. Keeping in mind we want to script all this at some point, we're looking for a line or two to get this working. 
 

The scp command syntax take the following form:

scp [OPTION] [user@]SRC_HOST:]file1 [user@]DEST_HOST:]file2
  • OPTION - scp options such as cipher, ssh configuration, ssh port, limit, recursive copy …etc.
  • [user@]SRC_HOST:]file1 - Source file.
  • [user@]DEST_HOST:]file2 - Destination file

Local files should be specified using an absolute or relative path, while remote file names should include a user and host specification. If you are looking for further options to use with SCP you can find them listed here.

 For our purposes we are going to use a script line similar to the following. You will need to change the paths etc. to suit your needs


#Now Use SCP to send to website
# Options: C=compress, v=verbose logging,-P specifies the port if not port 22, -i specifies the location of the local key

# tidied script
	scp -C -P23 -i /home/pi/.ssh/id_rsa $IMGFILE This email address is being protected from spambots. You need JavaScript enabled to view it.:/home/huttweat/public_html/data


Where:

  • /home/huttweat/public_html/data is the destination file location. Not specifying the actual file name means scp will use the original filename
  • $IMGFILE is the sourcefile, which is the variable used by our previous script to pull the file from a webcamera.


Putting everything together

 
So putting the "go get the webcam image script" and the "send the image to the website" scripts together we now get:
 
#!/bin/bash

# modifications by weather.net.nz with credit to alvinalexander.com
# a shell script used to download an image from an IP Cam URL and scp to a website.
# this is executed from a crontab entry.

#Next line sets logging detail
#set -x

#Set Download variables
# Put images in this directory (must exist)
	IMGDIR=/home/pi/myssd/WeatherD/webcam_images

# wget output animated file
	ANIFILE=webcam.`date +"%Y%m%d%H%M"`.jpg
# wget output webcam snapshot
	IMGFILE=jpgwebcam.jpg
# Specify wget log files. If not specified these end up in the script output
	LOGFILEANI=wgetani.log
	LOGFILE=wget.log
# Specify wget download url.  NOTE: &characters are escaped
	URL=https://192.168.2.119/cgi-bin/api.cgi?cmd=Snap\&channel=0\&rs=wuuPhkmUCeI9WG7C\&user=admin\&password=123456


#Now go and get the file(s) from the webcam 
#Options -O is the output file -o is the log output file
	cd $IMGDIR 
	wget $URL -O $ANIFILE -o $LOGFILEANI 
	wget $URL -O $IMGFILE -o $LOGFILE

#Now Use SCP to send to website
# Options: C=compress, v=verbose logging,-P specifies the port if not port 22, -i specifies the location of the local key

# tidied script
	scp -C -P23 -i /home/pi/.ssh/id_rsa $IMGFILE This email address is being protected from spambots. You need JavaScript enabled to view it.:/home/huttweat/public_html/data


Note that not all options are required, however these were the ones I needed to specify to get it to work for me.

One of the really nice things about this script is that it doesn't just work for webcam images. It will pull any file off your local machine / internet and publish it to your website/another machine, just by changing a few of the variables in the script around!

Finally a quick word about the cron job that calls this script every 15 mins that we set up in the previous article. Does it need changing? Well no not really. It's still going to call this script with the scp command in it and send an updated image to the website every 15 mins.


Supporting us and feedback

 
If you think this article was helpful, there are a number of ways you can thank us. Feel free to add a comment and say thanks in the comments section below. Also you are welcome to register on the site. The more members we have the more it encourages us to write these types of articles. Alternatively if you are into all that social media stuff, feel free to share the article using the buttons below, and tell others about the site. Thanks!!


New Zealand Weather Network - Raspberry Pi Weather Station image No comments
Use your Raspberry Pi to stream your IP camera to You Tube

Use your Raspberry Pi to stream your IP camera to You Tube

Looking to stream an IP camera to YouTube via a Raspberry Pi. Yes it can be done, and what's more it's reasonably easy to do. The use case for this article is based on setting up a feed for a weather camera, but you can follow the same process if you have another use case in mind.
I've been running the Weather Display software for logging all my weather data for years. I've always felt though that leaving a PC or laptop (I've tried both) on 24 hours/7 days a week just to collect and store weather data was a bit excessive. So the challenge was set - could I run and collect all the data I collected on my PC on a low power device like the Raspberry Pi?
 
You can read about my efforts to get the weather data collection onto the Raspberry Pi in a seperate post. However once I'd done that, I needed to move the webcam capture functionality.
 

What you will need

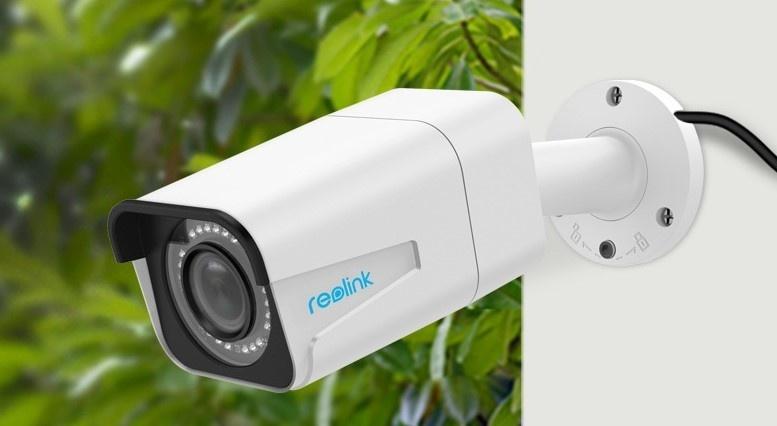
So I've started with a Raspberry Pi 4 with 4Gb memory, and my IP webcam being a Reolink RLC-511. The Reolink camera has a URL that I can access to get a RTSP (Real Time Stream Protocol) feed from. You might find your camera provides an RTMP feed. I'd recommend using the RTSP one if you can. You can read a bit about the differences here
 
So why not just share the URL to the camera on my website? Well I'm not that keen to give open access to anyone on the internet to my Web camera, so I needed something to sit between the camera, and where I was going to put the feed, in this case YouTube.


Getting Started

To kick things off you are going to set your camera up. The Reolink camera I used is easy to set up. It is a PoE camera so it's powered via the ethernet network cable that goes to it. I also plugged the other connection to a PoE enabled switch, which was then connected to my main router in the house. This injects the power into the network cable that the camera needs to operate. Reolink do provide self powered cameras, and even solar powered cameras, so choose an IP camera that suits your needs.


Setting up the software

My software of choice to take the feed from the Raspberry Pi was OBS Studio. I'd looked at a number of alternative options and most were driven from the command line, which I didn't mind too much but if I could find a UI option it seemed easier. Many of the command line options I looked at involved installing ffmpeg with a huge amount of config options. OBS Studio seemed simple enough to use however it was a PC based software - the exact thing I was trying to move away from.
 
Luckily though there is a way to load OBS Studio onto the Pi, and it turned out to be pretty easy, via Pi-Apps. Pi-Apps is a simple way of installing all sorts of software onto your Pi, one of which happens to be OBS Studio. The application "Pi-Apps" should already be available if you are using a standard Raspberry Pi build, otherwise you can run this from the command line to get it
 
sudo apt-get update && sudo apt-get install pistore
 
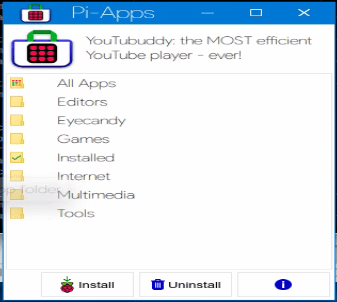
Once you have Pi-Apps, you can run this by going to accessories under the Pi menu, and clicking on Pi-Apps. You will eventually see a list of folders:
Pi Apps1
 Click on the Multimedia folder and then click on OBS Studio. Then go make yourself a coffee while it installs. Eventually you will end up with an OBS Studio application link to launch the program from, under the Sound and Video section of the Pi main menu! Clicking on that will bring up OBS Studio.


Setting up the YouTube side

We're going to start with setting up the YouTube side. If you have streamed live to YouTube before then you can get started immediately. If not you will need to have a verified account, and this process takes 24 hours. YouTube describes the streaming process here. 
 
Once you are all set up, go to your YouTube account. sign in. and click on the "Create" button (4th icon in from the top right), then click on "Go Live."

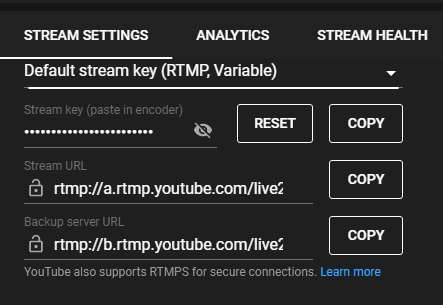
A screen will pop up - the key info we want at the moment is shown in the bottom left corner:

YTSettings 1


Reveal the stream key, and copy it. Paste it somewhere as you will need it later. Give your stream a name and any other details required by YouTube.


Setting up the OBS Studio side

Once you have opened OBS Studio, you will see the main OBS Studio screen. The top half will be blank, and the bottom half will look something like this:

OBS Studio1 

 For the basic setup there's only two places you need to worry about - the sources area and the controls area. For my use case I don't collect sound off the camera. First start with the sources area, in between the Scenes and the Audio Mixer panels.

Click on the plus icon and select "Media Source"out of the picklist that appears. Once the configuration box for the new media source comes up, untick the local file box. You should see something like this screen:

OBS Studio2

Paste the rtsp:// url into the Input field. For a Reolink camera there are instructions on the Reolink website to help you work out what this is. If you can't find a direct RTSP:// URL feed for your camera then you may have luck specifying it as rtsp://<ipaddress of camera>>/1 eg rtsp://192.168.0.16/1 where 192.168.0.16 is the IP address of your camera.

It is worth noting at this point that the IP address for your camera must be fixed. Obviously if this changes, any settings you put into OBS Studio won't then work, and will need updating. Normally you can allocate a fixed IP address on your router to your camera - you should see your router instruction manual if you need more information on how to do that.

You don't need to fill out the input format, and the default settings for network buffering and reconnect delay are fine, although you can fine tune them later if you wish. If you scroll down you will see some other settings, but again the defaults are fine. Click on OK to save everything. If you have done everything right, then the image from your webcam should appear where the blank space was before.

Now to set up the Controls section. In OBS Studio, click on the settings button on the lower right hand side. You will see the following screen 

OBS Studio3

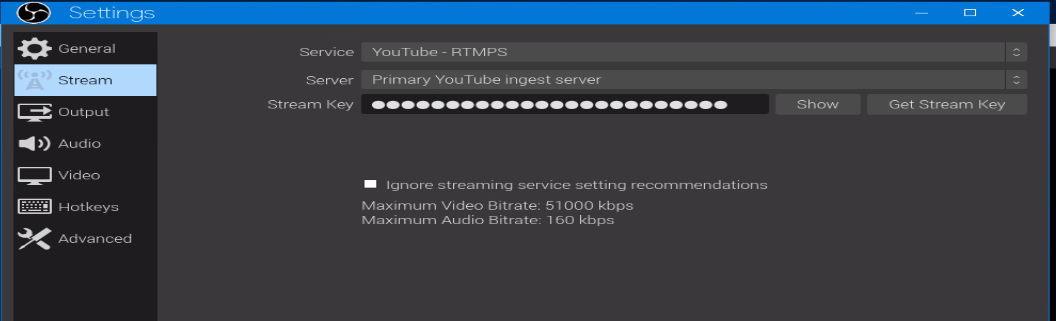
Click on Stream and paste in the stream key you got from YouTube, then click on OK. THere are a number of settings in this area you can play with. For example I've set the following details in the output screenOBS Studio4


And the following settings in the Video screen

OBS Studio5


After a bit of experimentation, this gives a stream that's the right size for my purpose, and minimises CPU usage. If you leave the settings as default the CPU may run hot on your Raspberry Pi. If you wanted to run the stream permanently you might want to consider purchasing a fan for the Raspberry Pi case.

Congratulations you now have your webcam streaming to your Raspberry Pi! 


Starting and viewing the stream

 
 With all that work done you are now ready to start your stream.
1: In OBS Studio, click on "Start Streaming" in the Control section
2: On YouTube Click "Create" and then "Go Live"
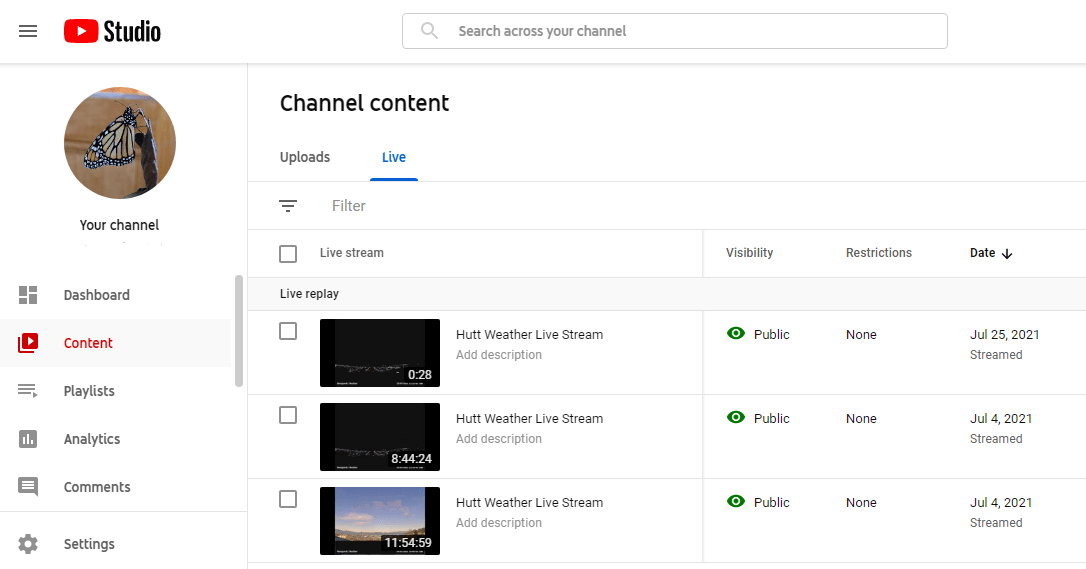
3: Wait around 30 seconds and your stream should then go live. You can find it on you channel content under the live tab.
 
YTSettings 2
 
Don't forget that if your stream stops for whatever reason, you need to restart it again in both OBS Studio and YouTube. This will create a new file in your YouTube channel content.
 
That's it. You are now streaming your webcam live to YouTube using a Raspberry Pi. Congratulations!
 

Supporting us and feedback

If you think this article was helpful, there are a number of ways you can thank us. Feel free to add a comment and say thanks in the comments section below. Also you are welcome to register on the site. The more members we have the more it encourages us to write these types of articles. Alternatively if you are into all that social media stuff, feel free to share the article using the buttons below, and tell others about the site. Thanks!!
New Zealand Weather Network - Raspberry Pi Weather Station image No comments
ConsoleWD - Weather Display for Raspberry Pi

ConsoleWD - Weather Display for Raspberry Pi

I've been running the Weather Display software for logging all my weather data for years. I've always felt though that leaving a PC or laptop (I've tried both) on 24 hours/7 days a week just to collect and store weather data was a bit excessive. Also they were Windows based machines, the never ending stream of updates meant that restarts of the machine were inevitable, and therefore so was the risk of some data loss.  So the challenge was set - could I run and collect all the data I collected on my PC on a low power device like the Raspberry Pi?
 
Turns out there are a number of ways you can do this using the following weather station software:
  • Weather Display's Raspberry Pi equivalent, Consolewd
  • WeeWx
  • CumulusMX
It goes without saying that to do this you need to have your weather station up and running, and the ability to interface your output onto the internet. In my case I have a Vantage Vue, with a Davis Weather Link Live that collects the data from the weather station. This setup would equally work with any of the Davis Vantage Pro models.
 
You also need to have a Pi3b or a Pi4b ready to go with the latest Raspian OS.
 

Deciding what weather station software to use.

As it was going to be a fresh start I wasn't tied to what piece of software I was going to use. I tried getting CumulusMX up and running and struggled a bit - my Linux fu not being all that good. I also had a bit of a go with WeeWx. However the instructions for Consolewd looked pretty easy for someone with limited Linux knowledge, so I gave it a go!
 

Obtaining Consolewd - The Weather Station Software for Raspberry Pi

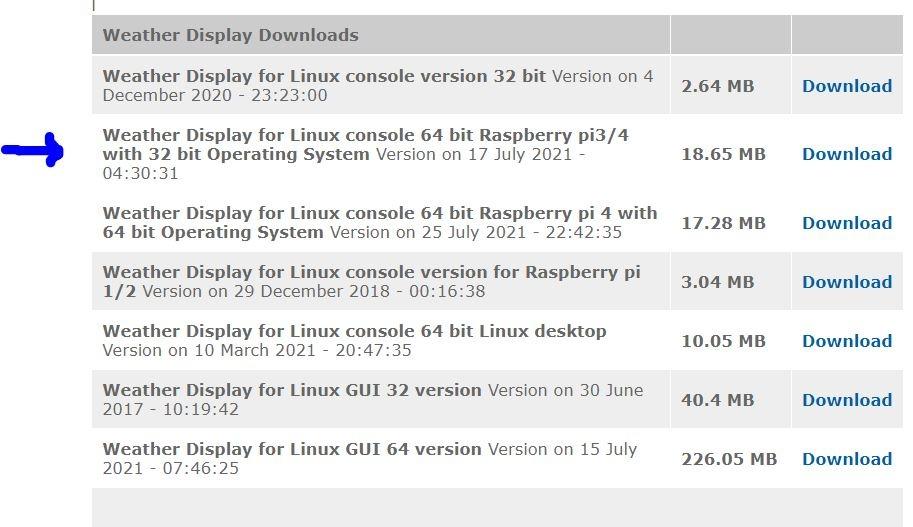
You can grab a copy of the software directly from the weather-display website. Unless you are running a 64bit OS on your Pi, then you will want the 32 bit version:
 
download consolewd
 
 
Note that the software comes at no cost, but you are encouraged to buy a licence or donate, especially if you expect support. The money you pay / donate appears to go towards developing more features for the software, something that the entire community of consolewd users benefit from. If you don't pay / donate then don't expect the support or new features to be added. So do the right thing!
 

Installation of ConsoleWD

Before you install the software you will need to do some network stuff first. You will want to make sure that your Raspberry Pi, and the data collection device (in my case the Weather Link Live), both have fixed IP addresses. This means that the network address you have for these devices doesn't change. This is importnt to make sure that the two devices can find each other on the network. To do this have a look in your administration panel on your router. Normally you need to find each device in a list on your router, and there is usually a way of fixing the IP address there.
 
Once you have downloaded your file, it should appear in the  /home/pi/Downloads directory. These instructions assume that's where the downloaded file is. From the desktop, open the File Manager, and navigate to the /home/pi/Downloads directory.
 
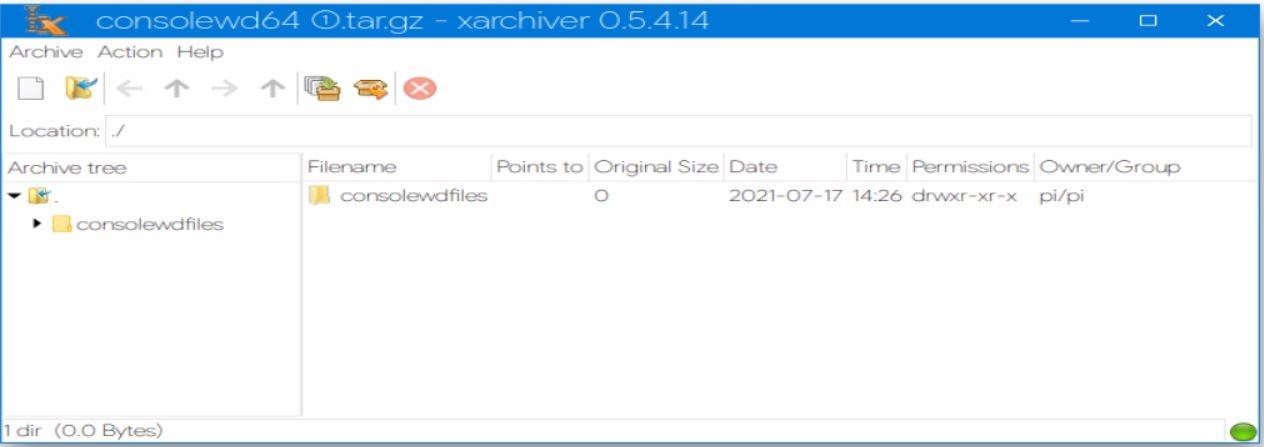
Locate the downloaded file. It's most likely called "consolewd64.tar.gz" .Click on this file and a utility to decompress the file will open similar to the following:
 
xarchiver
 
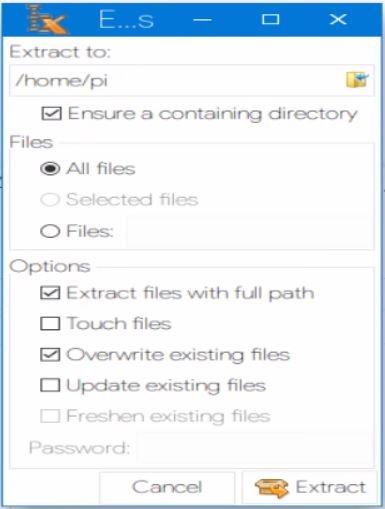
Click on the "Extract files" button - second button from the right on the top menu. You should see a dialogue box like the following pop up:
 
xarchiver dialogue
 
You will need to type or use the browse button to put /home/pi in the "Extract To:" box. Also make sure that "Extract files with full path" is ticked. Once that's all done, click on extract.
 
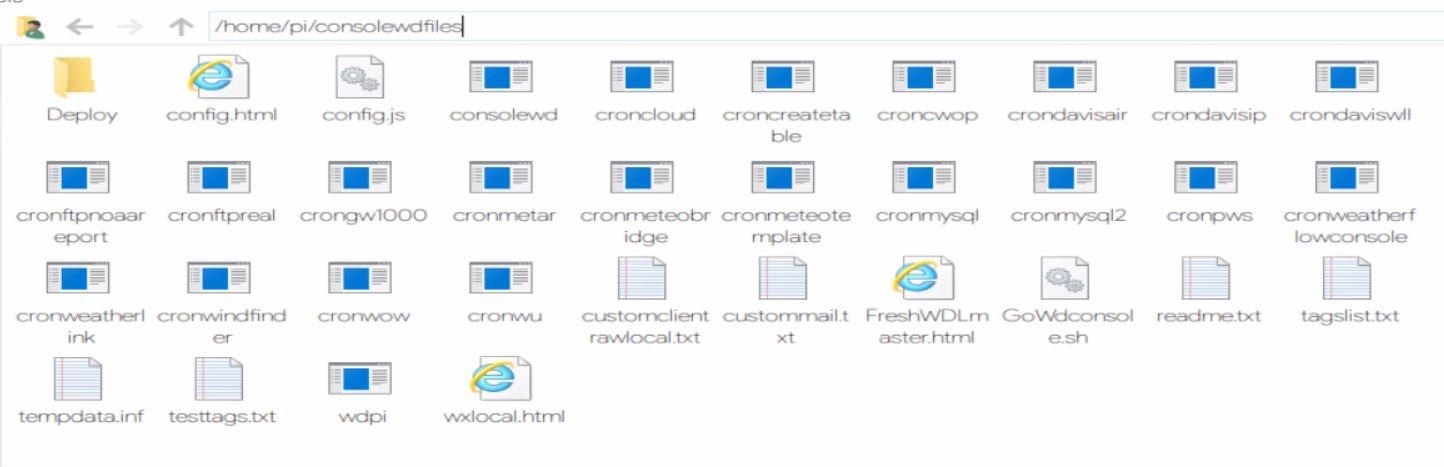
The consolewdfiles directory is created and the files are created within tht directory. You can now use the file manager to browse to the new directory and you should see the following:
 
consolewdfiles  
The next part is easier done in a command window. This step copies across some necessary files. Open a terminal window by right mouse clicking on the Deploy folder and choosing "Open in Terminal"
 
 
Now type in the following, pressing enter after each line:
 
sudo cp * /usr/lib
sudo cp * /usr/local/lib
 
Then close the terminal window, and the software install is done.


Configuration of ConsoleWD

You can do the next configuration step using nano or similar command line editor, but I'm going to show you how to use the inbuilt html configuration process. You can also perfrom the configuration using the text editor via the Raspberry Pi UI, once the initial file is created. We'll start with the basic setup you will  need to get up and running.
 
Once again go back to the consolewdfiles directory. Within that directory you will see a file called config.html. In the screenshot above it's the second icon in along the top. Click on that and it will open in your favourite browser. To get started the minimum you need to input will be the following:
  • Everything that is applicable under the heading ConsoleWD setup
  • Latitude and Longitude - available from Google Earth 
  • Station Name - your weather station name
  • FTP Settings - available from your hosting service
 Once you have made those changes , scroll down to the bottom and click on save. This will download a file, which you will find in the  /home/pi/Downloads directory.Once you've downloaded the file you then need to move that file back into your consolewdfiles directory, again using the file manager. 


Creating a start.sh script file

Once everything is configured and ready to go you will want to use a script file to start ConsoleWD.  You can think of ConsoleWD as a set of different modules, all of which need to work together. So far you are going to need to run 2 of those modules - consolewd,  the application and cronftpreal, the ftp program to upload your weather data to your website..
 
Browse to the /home/pi directory and again right mouse click on the directory folder, and choose Open in Terminal. We're going to use nano, a terminal editor to write the script. In the terminal window, type the following:
 
nano -e a_start.sh
 
and press enter. Then type the following:
 
#!/bin/bash
# Start WD components
./consolewd
./cronftpreal
 
Then hold down the CTRL key and press X (CTRL-X), type Y and press enter. You will end back up at the terminal window. The forst line in the script declares that it is a shell script. The 3rd and 4th call the consolewd and ftp components.
 
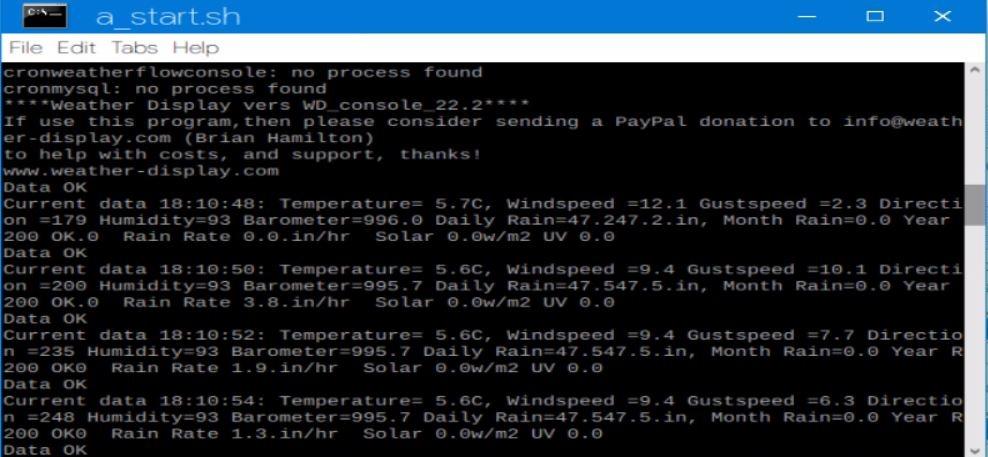
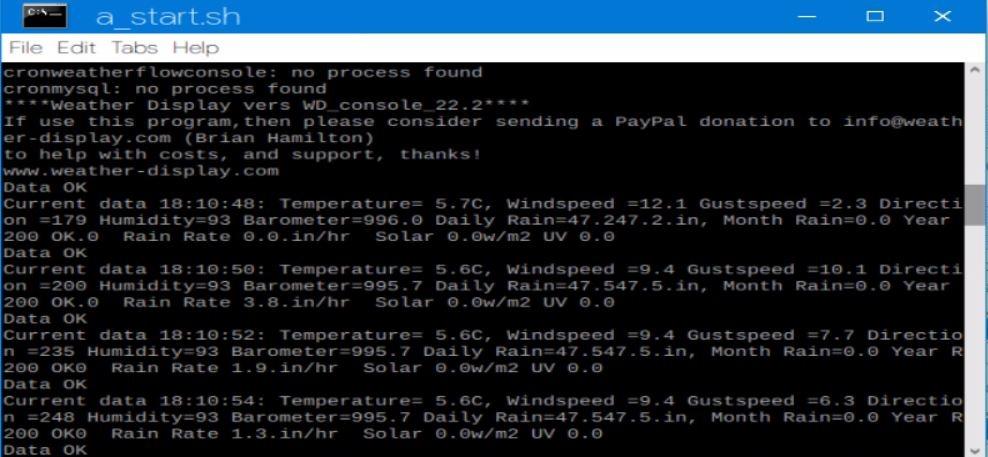
Once that's all done, go back to the file manager, and locate the file called a_start.sh . It should be near the top of the file list because we named it with the "a_" at the start of the file. Double click on the script, and you will be asked if you want to run it in a terminal window. Choose "Execute in Terminal".  A new terminal window will open. It will initially display a copy of your config.txt, then it will show (if everything is connected ok) a text string of your weather conditions similar to the following:
 
 
running


And that's it! There's a few more features which I'll cover off in another post, but if you have got this far you will understand how ConsoleWD works, and can most probably have a play configuring these for your self. If you do have issues, there is a support form located on the Weather-watch.com forum, or you can post your questions in our forum and we'll see if we can help out!


Supporting us and feedback

If you think this article was helpful, there are a number of ways you can thank us. Feel free to add a comment and say thanks in the comments section below, or provide feedback if we've got something wrong. Also you are welcome to register on the site. The more members we have the more it encourages us to write these types of articles.  Alternatively if you are into all that social media stuff, feel free to share the article using the buttons below, and tell others about the site. Thanks!!
 
 
New Zealand Weather Network - Raspberry Pi Weather Station image No comments

Building a Raspberry Pi Weather station from scratch

We're continually looking for good quality builds of Weather Stations. We are big fans of the low cost and extremely flexible Raspberry Pi, so this posting caught our eye!


https://www.raspberrypi.org/blog/build-your-own-weather-station/


If you have had a go at building one of these or any other suggestions for DIY type weather stations, we would welcome your comments!

New Zealand Weather Network - Raspberry Pi Weather Station image No comments
  • About Us
© 2026 Weather.net.nz. All Rights Reserved unless otherwise noted as third party copyright.